
Saturday, 04 July, 2026г.


Где искать: по сайтам Запорожской области, статьи, видео ролики
пример: покупка автомобиля в Запорожье
GSTR 2 Return File Live Demo with GSTR 2A Reconciliation Online
 У вашего броузера проблема в совместимости с HTML5
GSTR 2 Return File Live Demo
Step 1: Login into GST dashboard
Step 2: Go to Return Dash Board, Select Month July for July return
Step 3: Check details in GSTR 2A for auto populated data. Click on view. Check B2B Invoices details and other details
Step 4: Come back on GST return dashboard
Step 5: Select July Month
Step 6: Go on GSTR 2 and select prepare online (for online return filing)
Step 7: go in bottom and click on GENERATE GSTR2 SUMMARY to bring invoice details from GSTR 2A to GSTR 2.
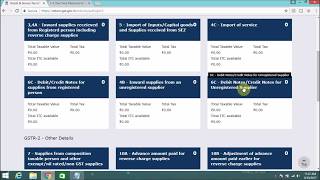
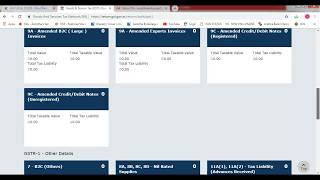
Step 8: Click on required tile e.g Inward supplies rceived from registered person including reverse charge supplies
Step 9: Click on Supplier details on the screen
Step 10: Click on Chek point and mark it with tick and click on Accept to accept or reject or pending. Now you will see accepted status on the screen if selected Accept option.
If you want to edit the details then click on the right side on the pencil icon and then you will see some blocked cells and some active cells. you can modify active cells on the screen. You can also modify details by clicking on invoice No.
Step 11: Add Missing Invoice if you find any invoice missing in GSTR 2 or if your supplier has not filed GSTR 1 Return and your return filing status in GSTR 2A in the tiles of "submit status" was showing No instead of Yes then you can add the same details in the option of "Add Missing Invoice" and put all the details of missing invoice
Step 12: Now you can generate preview and download the same
Step 13: Submit GSTR 2 Return
Step 14: Mark on check point and Click on the option of "File Return"
Step 15: Now you can file with either DSC or EVC Code.
Step 16: Your return is filed and it will show status on return dash board "Filed"
If you liked this video, please subscribe our channel
Теги:
GSTR 2 GSTR 2A GSTR 2 Return Online GSTR 2 Return GST Return GST Return filing live demo gstr 2 a live demo gstr gst return preparation cgst gst sgst onlince gst return gst return 2
Похожие видео


Мой аккаунт