
Friday, 10 July, 2026г.


Где искать: по сайтам Запорожской области, статьи, видео ролики
пример: покупка автомобиля в Запорожье
Supervised Classification using ArcGIS
 У вашего броузера проблема в совместимости с HTML5
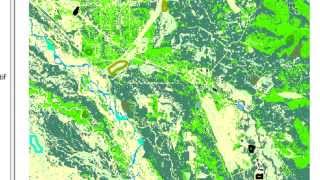
To classify the image, the Maximum Likelihood Classification tool should be used. This tool is based on the maximum likelihood probability theory. It assigns each pixel to one of the different classes based on the means and variances of the class signatures (stored in a signature file).
Unsupervised vs Supervised Classification in Remote Sensing
Previously, we’ve explored digital image classification techniques like unsupervised classification, supervised classification and object-based.
Also, we’ve gone into great detail how to do object-based image classification.
Now, it only makes sense to practice supervised and unsupervised classification with some examples.
Supervised Classification in Remote Sensing
When you run a supervised classification, you typically go through the following 3 steps:
Step 1 Enable Image Analysis Toolbar
Step 2 Select training areas
Step 3 Generate signature file
Step 4 Classify
Unsupervised Classification in Remote Sensing
Unsupervised classification is different because it does not provide sample classes.
First, the user identifies how many classes to generate and which bands to use. Next, the software then clusters pixels into the set number of classes. Finally, the user then identifies the land cover classes.
Unsupervised Classification Steps:
Generate clusters
Assign classesStep 1 Activate Spatial Analyst Extension
Step 2 Generate clusters
Step 3 Assign classes
Classifying Images with Supervised and Unsupervised Methods
This sums up some of the basics for unsupervised classification in remote sensing.
We generated unknown classes (isodata) using iso clusters. Next, the user identified each cluster with land cover classes.
Some manual editing may be necessary if there is confusion between classes.
Put these steps to practice and generate some land cover of your very own.
Select training areas
Generate signature file
Classify
التصنيف المراقب باستخدام برنامج ارك جي اي اس arcgis
التصنيف المراقب والغير مراقب باستخدام برنامج ارك جي اي اس
Теги:
Supervised Classification using ArcGIS arcgis Classification using Supervised Supervised and Unsupervised Classification in Remote Sensing التصنيف المراقب والغير مراقب التصنيف المراقب ارك جي اي اس برنامج ارك جي اي اس باستخدام برنامج ارك جي اي اس Maximum Likelihood Classification Likelihood Classify
Похожие видео


Мой аккаунт