
Thursday, 25 June, 2026г.


Где искать: по сайтам Запорожской области, статьи, видео ролики
пример: покупка автомобиля в Запорожье
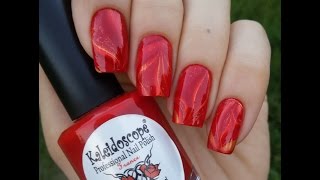
WATER MARBLE STICKERS HOW TO
 У вашего броузера проблема в совместимости с HTML5
Learn how to make a water marble sticker,simple and easy. Now it's easier to apply water marble on your nails and cheat at water marbles, anyone can do it! Yes that means you!
It's Water Marble Shout Out Time! Let me know your FAV? And keep the color combos COMING!!!!
Instructions:
1. Pour room temperature water into a disposable cup or a glass cup or even a shot glass, almost to the top. Open all bottles of polish and place them within reach. The reason you have your nail polishes ready is because you will have to work fairly quickly.
2. Drop one or two drops of polish onto the surface of the water. The nail polish should spread out and make a circle on the water. If it drops to the bottom without creating a circle on the surface, try a different nail polish. This color is your base color for the marble effect, meaning it will show the most. (Try not to hold your brush to high or the polish will drop to the bottom and also use a polish that is thin) FYI, thicker nail polishes tend to have problems spreading in the water.
3. Drop one or two drops of your second color of nail polish on top of your base color. It should create a smaller circle on top of your base color. (Another tip, if you polish doesn't spread easily you can also try to shake your cup or glass a bit to help the process)
4. Continue with each color that you would like to add to the effect. You can use many colors or you can use only two or three colors, repeating each color at least once in the same order.
5. Drag the tip of an orange stick/tooth pick/safety pin through the circles of polish to create the marble effect. Begin at the center and drag the tip toward the outer edge. Reverse this for more swirls.
6. Insert your nail. The nail polish will adhere to your nail.
7. Use a Q-Tip or an orange stick/tooth picks to remove the excess nail polish on top of the water. Carefully remove tape or use nail polish remover and cotton swabs to clean around your nail.
8. Wait for your nail to completely dry and apply a top coat.
This is both fun and creative and simple once you get the hang of it, I hope you enjoy this video, because I enjoyed making and sharing my skill with you.
?Follow me on Instagram! https://www.instagram.com/dearnatural62/
?SUBSCRIBE for FREE and become a DN Fan: http://goo.gl/EUAsIf
?Tip the channel via PayPal: https://www.paypal.com/paypalme2/dearnatural
▬▬▬▬▬▬▬▬▬▬▬▬▬▬▬▬▬▬▬▬▬▬▬▬▬▬▬
??▼ Recommended Best Business Tools ??▼
?#1 Youtube Optimization Tool: https://www.Tubebuddy.com/dearnatural62
▬▬▬▬▬▬▬▬▬▬▬▬▬▬▬▬▬▬▬▬▬▬▬▬▬▬▬
▼??WHAT TO WATCH NEXT ??▼
? Nail Art: https://goo.gl/0m6sfq
? Nail Hack: https://goo.gl/cfqL73
? Lifestyle: https://goo.gl/tsAZue
? Natural Hair: https://goo.gl/TGVnc6
? TALK TO ME ON MY SOCIAL MEDIA!
?SUBSCRIBE to DEARNATURAL62 NOW► http://goo.gl/EUAsIf
♥INSTAGRAM : http://instagram.com/dearnatural62
♥PINTEREST: http://pinterest.com/dearnatural62
♥FACEBOOK: http://www.facebook.com/Dearnatural62
♥TWITTER: http://twitter.com/dearnatural62
✉ For business inquiries, email: [email protected]
▬▬▬▬▬▬▬▬▬▬▬▬▬▬▬▬▬▬▬▬▬▬▬▬▬▬▬
??▼ ?YOUTUBE/IG EQUIPMENT??▼
LED Video Lights: https://amzn.to/2NP36qW
Diva Ring Light Super Nova 18" Dimmable w/ 6' Stand: https://amzn.to/32NjEnk
Mocsicka Pink Flower Wall Backdrop on IG: https://amzn.to/2qNQIOJ
Etekcity Remote Control Outlet Wireless Light Switch: https://amzn.to/2Obkbu2
Hampton Bay Background Uplight Floor Lamp White: https://amzn.to/33NdwwN
Neewer Smartphone Video Rig:https://amzn.to/2O9aZ9s
MeFOTO BackPacker Classic Lightweight:https://amzn.to/2QkSu4w
UBeesize 60-inch Camera Tripod:https://amzn.to/2CGMR8Q
●▬▬▬▬▬۩ ● D I S C L A I M E R S ● ۩▬▬▬▬▬●
This video is not sponsored!
Теги:
Water Marble Nail how to water marble nail art tutorial easy nail art diy nail art cute nail art watermarble nails watermarble nail art water marble nail art compilation water marble nail art simply nailogical water marble nail art without water how to cheat at water marbles easy water marble nail art designs water marble art stickers
Похожие видео


Мой аккаунт